
Import or Export Custom Fields
Rather than manually creating individual custom values that can appear in the custom fields on the Workflow Client, you can import the values from a previous version of Print Audit. These instructions help you create Import task or Export task for custom fields.
To review the values used, you can also export a report of custom fields and values.
- Select Administration from the ribbon.
- Select Custom Fields → Import/Export.
- Choose either Import or Export to create a task. Instructions for each task are provided below.
Import Custom Fields
Ensure you create the custom fields in the Fields and Values screen first before you attempt to import values.
- In the Name field, enter a name for the Import task. You will use this name to identify the Import task later in the Tasks screen.
- From the Custom Field list, choose the Custom Field you want to populate with values. This field is populated from the custom fields you created within Workflow's Custom Fields list.
- From the Type list, select the version of the Print Audit values file that you are importing. Options are Print Audit 4, 5, or 6.
- From the Source list, choose one option:
- Uploaded file – Select the file when you run the import task
- Network location – If you select this option, you can type the Network folder path in the field.
- Web Download – Requires the web URL, username and password.
- FTP Download – Requires the FTP URL, username and password.
- Click Create. The Edit Import screen appears, and you can select additional options prior to running the task if necessary:
- Send Email notification – Enable this option if you want the system to send a notification email when this task is run. The email is sent to the addresses identified in Email Configuration and Email Logo.
- Overwrite matching – If any existing custom field data matches the data you are importing, the existing data is overwritten by the imported values.
- Set Missing Inactive –Enable this option to set any custom field values in the database, but not in the import, to inactive status.
- To run the task:
- To run the task immediately, click Run in the top right corner of the screen. If you selected Uploaded File as the source, a screen appears and you can browse to the file before proceeding. You will see a progress bar as the task runs. The screen will update to indicate the success of the task.
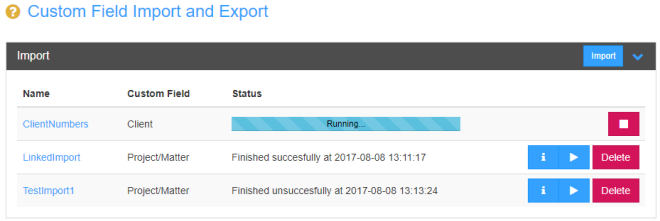
- To run the task later, click on the Custom Fields Import/Export Tab to view all created Import and Export tasks. You will see your task under Import. You can either click the Run icon to run the task at any time, or you can delete the task if it is no longer relevant.
- To set this task to run on a set schedule, see Schedule Tasks to Repeat.
- To run the task immediately, click Run in the top right corner of the screen. If you selected Uploaded File as the source, a screen appears and you can browse to the file before proceeding. You will see a progress bar as the task runs. The screen will update to indicate the success of the task.
Export Custom Fields
Use this export feature to review all custom fields and values that are currently in use.
- In the Name field, enter a name for the Export task. You will use this name to identify the Export task later in the Tasks screen.
- From the Custom Field list, choose the Custom Field values you want to export.
- From the Type list, select the version of the Print Audit values file that you are exporting.
- From the Destination list, select one option:
- Download –Downloads the file to the specified Downloads folder on the local computer.Email – You can attach the export file to an email message. If you choose this option, 'From', 'To', 'Subject', and 'Message' fields also appear.
- Email – You can attach the export file to an email message. If you choose this option, 'From', 'To', 'Subject', and 'Message' fields also appear.
- Network Folder – If you select this option, you can then type the Network folder path in the Folder field.
- Click Create to create the Export task. The Advanced Export parameters screen appears with additional fields.
- Enable Send email when complete if you want to send a notification email when you run this task. The email is sent to the addresses identified in Email Configuration and Email Logo.
- If you want to re-run this export on a set schedule, click 'Create' in the Schedule section. Follow the instructions in Schedule Tasks to Repeat if you need assistance with the schedule options.
-
To run this task:
- To run the task immediately, click Run in the top right corner of the screen. You will see a progress bar as the task runs. The screen will update to indicate the success of the task.

- To run the task later, click on the Import/Export Tab to view all Custom Field Import and Export tasks. You will see your task under Export. You can either click the Run icon to run the task at any time, or you can delete the task if it is no longer relevant.
- To set this task to run on a set schedule, see Schedule Tasks to Repeat.
- To run the task immediately, click Run in the top right corner of the screen. You will see a progress bar as the task runs. The screen will update to indicate the success of the task.
- To edit the task parameters, click on the task name.
- Based on the parameters you set for this task, various icons may appear beside the task:
| Icon | Action |
|---|---|
|
|
Runs the task immediately. |
|
|
Opens the Task Details screen. This screen provides information about the number of values downloaded, who ran the task, and when the task was last run. You can view the Event log or and Error log from this screen. The location of the Error Log is determined in the Task Configuration fields. |
|
|
If you enabled Download as the Destination, click this option to re-download the file. |