Manual Installation Instructions: Installing the Embedded for Ricoh Xlet installation package on the server
Before deploying Embedded for Ricoh Xlet, you must first set up an appropriate .dalp file.
After the .Dalp files is set up, the installation package for Embedded for Ricoh Xlet must then be installed on the server before it can be deployed.
Set up the .Dalp file for Deployment
Locate the line containing: <argument>CLIENTSERVICE_URL=https://11.22.33.44.55</argument>
- Download the latest Embedded application.
- Extract the compressed file to a PC.
- Navigate to the extracted file folder and open the file with the .DALP extension in Notepad, for editing.
Locate the line containing: <argument>CLIENTSERVICE_URL=https://11.22.33.44.55</argument>
Change the IP address to the IP address of the server where the Ricoh Xlet is installed for this MFD
- Save the DALP file
-
Re-ZIP or compress all the files using any file name
Deployment Steps
- Open a Browser and enter the IP address of your device to go to the Web Image Monitor (WIM) page of the MFP.
- Log on to Web Image Monitor (WIM) as an admin. Note: the default log-in is “admin” with no password, but a password may be required.
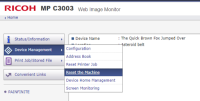
- Select Configuration from the Device Management or Main Menu.
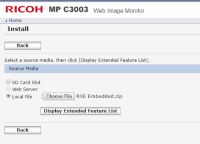
- Select Install under Extended Feature Settings.
- Select the Local File radio button and then click the Choose File or Browse button.
- On the local PC, navigated to the extracted folder you created from the downloaded Embedded application. Select this folder and click the Open button.
- Click the “Display Extended Features List” button.
- Select Install to “Device HDD” from the Installation Target Setting drop down box..
- Select the Auto Start “On” radio button.
- Select the radio button next to Print Audit Embedded under Extended Feature Name dialogue box.
- Click the Install button located above the Extended Feature Name dialogue box.
- Click OK on the Confirm page to begin the installation.
- If the installation is successful, you will see a blank installation screen. There is no indication of success or failure on this screen.
- Click the Back button on the blank installation screen.
- The Configuration screen will be displayed, click Home to return to the WIM home page.
- Click the Device Management button and then the Reset Machine/Device button.
- Click OK on the next screen to confirm Device Reset.
- After the device has reset, Log back in as Admin.
- Select Configuration, then Extended Feature Settings from Extended Feature Info to verify the installation. If you see the Ricoh Xlet application listed, then the installation was successful.
Confirm the Device Settings
Confirm the SP Settings
On the device, go to SP mode and:
- For code 5113
- Set value 1 = 0
- Set value 2 = 1
- For code 5191
- Set value to 1
Confirm the Function Priority
If the embedded main menu or the Print Audit icon is not displayed when the device is started, then you must change the Function Priority on the Ricoh MFP. Depending on the type of Ricoh MFP, setting the Function Priority will differ:
Legacy Operation Panels
- At the MFP, click on User Tools/Counter --> System Settings.
- For newer Java MDF's, set Function Priority to Print Audit.
- On older Java MDF's, set Function Priority to Java TM/X.
Generation 1 Smart Operations Panel
- At the panel, login as administrator.
- Select the Screen Feature icon.
- Go to Screen Device Settings.
- Go to Function Priority.
- Scroll through the list of functions. Select Print Audit.
- Logout.
Generation 2 Smart Operations Panel
- At the panel, login as administrator.
- Select the User Tools icon.
- Go to Screen Device Settings
- Go to Function Priority.
- Scroll through the list of functions. Select Print Audit.
- Logout.


