
Installing Embedded for Kyocera
Carefully review the steps below before proceeding with your installation.
Installation Steps
- Install and configure Printanista Workflow with the appropriate licensing.
- Deploy the Embedded for Kyocera client to the device using NetViewer, or from flash drive as per below.
- Download the Embedded for Kyocerasoftware.
- Download and install the latest version of Kyocera Net Viewer, if deploying from NetViewer – instructions below.
- Install the Embedded Application using NetViewer and configure via Printanista Workflow or directly on the MFP.
- Create the record for the MFP in the Printanista Workflow Administrator Embedded section.
- Verify operation and tracking of the MFP.
Deploying the Embedded for Kyocera client to the MFP
There are two methods of deploying the Embedded for KyoceraClient to a Kyocera device:
1. Deployment via Kyocera Net Viewer application.
2. Deployment via flash drive (USB port).
Deployment via Kyocera NetViewer
- Download the latest version of Kyocera Net Viewer from the Kyocera website.
- Download the latest version of Embedded for Kyocera.
- Extract the files from the Kyocera Net Viewer zip file:
- Choose where to extract the files
Navigate to the extracted directory and run Setup.exe
- Follow the prompts to complete the Net Viewer installation
- Run the NetViewer application
- If this is the first time it is run, choose the location for a workspace
- In the Add Devices Wizard, select Express or Custom to begin search for devices on the network
- Express will use the default IP range available to the workstation
Custom will allow the configuration of specific IP address(es) and other settings to discover devices
- When device discovery has completed, the General view will be displayed, and the discovered device(s) will be shown
- Right click on the Kyocera device to which you wish to install
- Select Communication Settings
- In the Login section, enter the user name and password of a Kyocera device-level administrator user and set Authenticate mode switch to Use local authentication
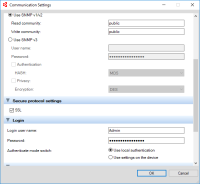
- Select OK to close the Communication Settings window
- Right click on the same Kyocera device and select Advanced
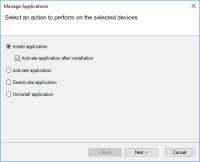
- Select Manage Applications
- Select Install application
- Check the box for Activate application after installation and click Next
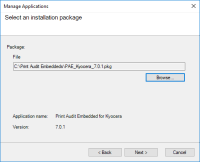
- Use the Browse button and go to the location where Embedded for Kyocera was saved.
Select the “PAE_Kyocera_x.x.x.pkg” file and click Open.
-
- Click Next and a confirmation window will be shown that lists the information about the package you are installing and device it is being installed to.
- Click Finish and you will be taken to a screen that displays the progress of the installation. Success will be displayed under the Result column once installation completes.


- Click on Close
- Repeat as necessary for the other Kyocera devices where the client needs to be installed
Deployment via Flash Drive
Please note that the USB Flash Drive containing the Embedded for Kyoceraapplication package must be formatted to FAT32 prior to copying the package to it. Other file system formats will not be recognized by the MFP.
- Insert the USB Flash Drive containing the Embedded for Kyocera application to be installed into the USB Port
- If prompted "Removable Memory was recognized. Displaying files. Are you sure?", press No
- Press the System Menu key on the Operation Panel or the System Menu icon on the Kyocera's LCD console
- Navigate to the Application key and press it.
- When the user authentication screen appears, enter the device-level administrator username and password for the Kyocera MFP.
-
Press Add
Select the Embedded for Kyocera application and press Install
- When the confirmation screen appears, press Yes
- Press Close to return to application list
- Select the Embedded for Kyocera application in the application list
-
Press Activate
- Confirm activation, press Yes
-
Once the activation is complete, the Embedded for Kyocera start screen will appear within a few seconds.