Edit an Accounting Run
The Accounting Run provides either a summary or detailed report of all jobs within a specified data range. You can modify the columns within the report if you want to see something specific. The Task Run creates a .csv file that you can review in an external editor.
- Select Job Accounting from the ribbon.
- Select Export.
- Select Accounting Run.
- To run using the default selections, click Run immediately. Otherwise, change one or more options as described below and then click Run. The Run History section is updated each time you perform a run to allow you to revisit a run. Click Details and then click Results if you selected Download as the Destination. Otherwise, the file saved on the network drive you specified.
General
Choose either Detailed or Summary.
To receive an email notification when the task is run, enable this option.
Destination Settings
Click Edit to change the Export Destination settings.
Select one of String Delimited, Fixed Width or XML. The type you choose determines the remaining options that will be available for selection.
Applicable to String Delimited and Fixed Width only. Choose the option to indicate the end of line marker from the following: No Delimiter, Custom Delimiter (enter the character(s), CR Only (Macintosh), LF Only (Unix), CR and LF (Windows).
Enter a character that will separate the values in a row.
Enter a character to indicate how the values in the file will be formatted. For example, you could indicate that the values in the file will be wrapped in double quotation marks, and any quotes within the value will be escaped.
Indicates if the field delimiter is applied to the start of the row.
Indicates if the field delimiter is applied to the end of the row.
Adds a row to the output file containing the name of each column. The row added is the first row.
If the Field Delimiter character is identified more than once, the extra delimiter is removed.
From the Destination list, select one option:
- Download – Downloads the file to the specified Downloads folder on the local computer.
- Email – You can attach the export file to an email message. If you choose this option, 'From', 'To', 'Subject', and 'Message' fields also appear.
- Network Folder – If you select this option, you can then type the Network folder path in the Folder field that appears.
- FTP Upload – Requires the FTP URL, username and password.
- Web Upload – Requires the web URL, username and password.
Data Format
Indicate how the decimal values will be formatted in the export.
Enter the characters that should be removed from the data.
Specifies how the date will be formatted in the export.
Specifies how the time stamps will be formatted in the export.
Column Mappings
Click Change to view the column options and add or remove columns.
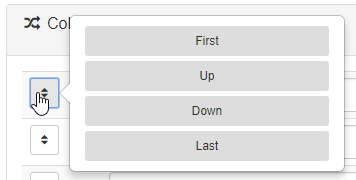
To dictate the order of columns in the exported file, click on the Order button beside a column. You can choose First, Last Up or Down to change the order of the column's appearance.

Per column, select either Ascending or Descending to change the sort order within the column.
Click Remove to remove a column entirely.
Click in the Add a New Column field to choose a new column to add. There are approximately 30 additional columns to choose from.
When finished making changes to the columns, click Save.
Schedule
Set a schedule to re-run this Accounting Run using these configured settings at a specified/repeated date and time. For example, you may choose to re-run this report once per month and you can set up a monthly schedule to perform the run automatically. Click Create to set up a task that will re-run this Accounting Run.
Enter a unique name for the scheduled task.
To run the task the next time the schedule settings are met, ensure the task is Enabled.
Select the frequency from the Repeat list: Daily, Weekly, Monthly, or Yearly. Also select the accompanying days, time, day, or month based on your choice of repeat frequency.
Click Create to finalize the schedule. The new scheduled task appears on the Scheduled Tasks screen, and you can view the Next Run column to determine when the task will run next.

Run History
The Run History provides at-a-glance information about the runs. Click Details to view additional information, including access to Download the export if you chose Download as the Destination. To remove a run from History, click Clear Run.
