
Use the Client Popup
If your Administrator installed the Workflow Client software on your computer, you will see the Client popup after you submit a print job. Depending on the options your Administrator has set, you may have to enter some information in the popup before you can proceed and submit the document.
If you are printing a large document, there may be a delay before the popup appears. In this case, the Administrator has set an option to wait until all pages are counted before displaying the popup to ensure that you are provided with accurate cost and page information.
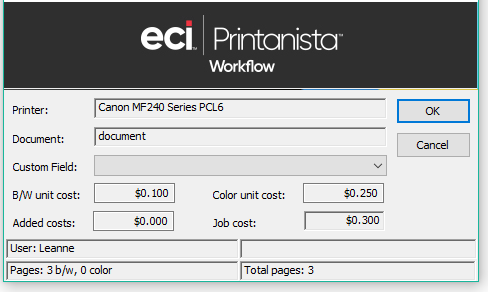
The popup presents the following information:
- Printer name – The name of the printer (queue) you selected when you submitted the print job within the application.
- Document name – The name of the document (derived from the application).
- Custom field(s) – If an Administrator has set up one or more custom fields, you must select an option or enter text before you can proceed. For example, if your company use matter codes, you may have to select or enter the appropriate matter code in a custom field.
- Costs – Reports the breakdown of b/w and color unit cost, if any added costs will be applied to the print job, and the total Job Cost that will be applied.
- User – Your user account name.
- Page breakdown – The number of b/w and color pages in this print job.
- Total pages – The total number of combined b/w and color pages in this print job.
Once you click 'OK', the job is submitted to the selected print queue. If secure release is enabled, you can proceed to a release location to print your job. If secure print is not enabled, simply proceed to the selected printer to retrieve your print job.